Friday
freebie


http://www.4shared.com/Easter_bunny_frame1.htm
http://www.4shared.com/Easter_bunny_frame2.html


http://www.4shared.com/Easter_flairs.html
http://www.4shared.com/Easter_stamps.html


http://www.4shared.com/Yet_another_bunny_tag.html
http://www.4shared.com/Felt_bunnies.html


3 frames in .png format
http://www.4shared.com/Easter_bunny_frame3.htm
http://www.4shared.com/Easter_bunny_frame4.html
Just thought I would share some of the photos from our vacation in Rome, Italy last week. The backgrounds are actually walls from the houses in Rome, because I really love those colors. I added an angel, a road name, the graffiti and the menu on the wall.


The bag to the right contains a .PSP label holder template, where you just have to apply your own color/pattern to the two color layers.
The bag contains 4 different set of screws to apply to the label holders too.
The bag also contains a grey scale .PNG file, which of course can be re colored, or - if you are a Photo shop user - you can easily make your own . PSD template in a couple of seconds from the .PNG file, if you follow this easy mini tutorial:
1. Open the .PNG file, and go to
"Layers"/"Add Layer Mask"/ "Reveal All".
2. Apply two color layers on top of the mask layer, the first with layer blend mode "multiply" (100% opacity) and the next with layer blend mode "overlay" (50% opacity)
3. Now group the two color layers you just made with the previous layer with the mask "Layers"/"Group with previous".
4. Fill the color layers with your color/pattern
So, hope that you will have fun making your own label holders!


http://www.4shared.com/Label_holders.html
I needed some polka dots for the label holder above, so thought I would make some pre made polka dot templates. There are 3 .PSP templates in this bag, just apply your own color to either the background or the polka dots, merge all layers and you are done.
htttp://www.4shared.com/PSP_polka_dot_templates.html
When we were in Rome, I bought some funny table mats
at a Karl Lagerfeld photo exhibition. They looked like
a restaurant table covered with a white cloth and had
plates,
cutlery and different objects on it, so
I thought it could be fun to make something similar as a
quick page,
and
I came up with these 3 pages.
You can
download here:
Page 1 (with fork, napkin, wine stain and earrings)
Page 2 (with knife, ticket, apple seeds and cigarette)
I made an additional page with a cup of coffee and a paper napkin too, that
one is available here: Page 2a
Page 3 (with spoon, champagne cork and sunglasses)
Of course you can add other objects too, like tickets,
notes or whatever from your own holiday. If you want to
add more photos, the frames I used can be found on my Page 7 (9 curled frames).


http://www.4shared.com/file/YaIaukWC/Crayons.html
Not so exiting actually - LOL, but I needed some small pieces of cloth the other day, and thought that I would post them too.
http://www.4shared.com/Pieces_of_cloth.html
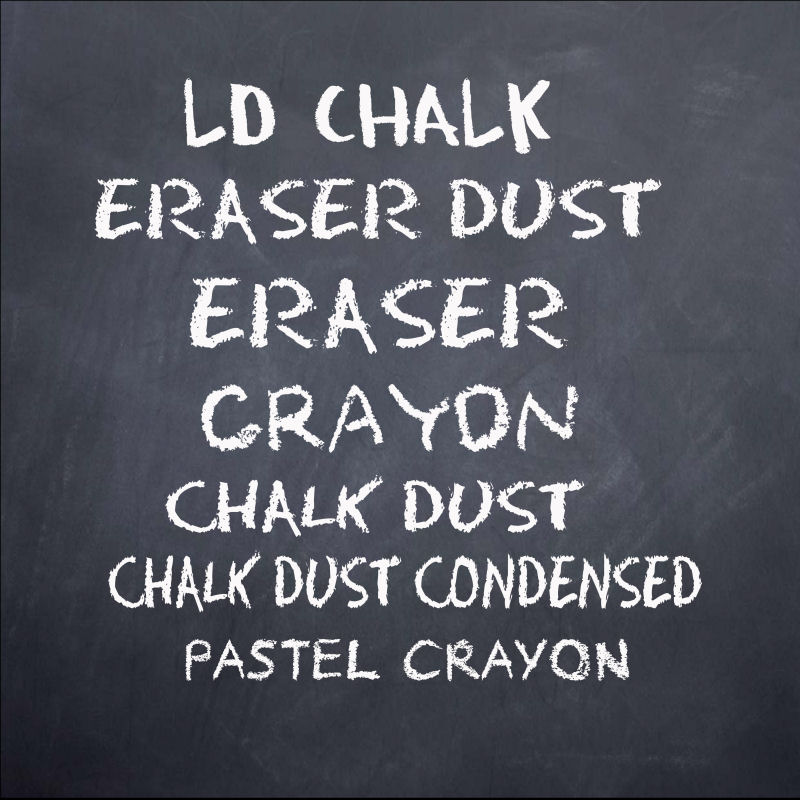
I was looking for a nice crayon/chalk font to use with the crayons above, and found the fonts above. I think that my favorite font is maybe "Pastel" by http://www.dafont.com or "Crayon" by http://www.abstractfonts.com, they look good even in a larger size.
![]()
If you want to make your own chalk text though, there is a nice Photo shop tutorial here: http://www.foundmyself.com/forum/viewtopic.php?t=562
Some other nice fonts are "Rouhage" or "Tiza". "Lippy" or "Okay crayon" are very pretty too, but they are unfortunately not free.

![]()
Time for another small tutorial. Some of you asked how I made the cherub face on the Roma layout above. It was very easy, I just applied the picture of the cherub on a new layer, and changed the layer blend mode to "soft light" and gently erased some of the parts outside the cherubs face. This works best when you use a grey scale image with good contrast though.
This question did however remind me of another easy blend mode technique I use very often. Here I found an old clock on a white background and wanted to insert it in my layout. You can of course use any image, as long as it is on a white or very light background. In this case there is already a nice drop shadow on the clock, so I would like to keep that too. However removing the white part around the clock and inside the different chain parts is a bit tricky and takes WAY to much time, so this is how I "cheat" (see below). This is a very quick and easy technique and the good thing is that you don't have to be that accurate, just make sure to apply the white airbrush at a rather low opacity, then you can't mess it up. I used a small brush tip on the chain, and a bigger one on the clock face. Use the zoom tool to see the details on "difficult" areas.
Ups, I forgot to mention that you must of course use WHITE color when you airbrush your background (point 3 below).


4 different bent picture frames in .png format.
http://www.4shared.com/4_bent_picture_frames.html
4 cute bunny tags in .png format
htttp://www.4shared.com/Bunny_in_teapot_tags.html

I made these pennants the other day, and was so inspired by the spring colors, so I decided to collect some of my
old - and a few new - freebies and put them together in an element kit.
Of course some of you faitfull readers will recognize most of the old freebies (some of them recolored), but it will maybe give new readers a little idea about what I do. If you don't want to download the whole kit, the newest freebies can be found just above and to the left.
The kit contains a total of 80 different elements, so there
is really
a lot to chose from. I am not planning to make other kits in the future. However this was just so fun, so
I couldn't resist making a small kit at least once. As you can see, there are no papers included, as I really suck at making papers, and there are a lot of nice papers available on the web. Each part of the kit is about 20MB.
Download the kit here:
Part 1: http://www.4shared.com/Spring_kit1.html
Part 2: http://www.4shared.com/Spring_kit2.html
Hope you will have fun playing with the elements!
http://www.4shared.com/file/QKhlbEny/Pennants.html


I had so much fun making these post-it flags. First I just made some simple ones, but then I thought they would look fun with some text or punched holes with different shapes. So this bag contains 10 x 6 flags with different tops.
The bag also contains a .PSP template, so you can make your own post-it flags with the colors you prefer. Just paste your color into the 6 color layers.
Use the post-it flags to "tag" your pictures or maybe apply a letter to the top of the flag to make an alpha of your own.
If you want to make similar flags with letters like the ones below, I used the font "Impact label" to make them. "Impact label" is a free font from http://www.dafont.com/
Hope you have fun playing with these post-it flags!
Download here: http://www.4shared.com/Post-it_flags.html
Tip: If you want to make similar flags, I used a blurred grey scale picture of an Irish blue sky with white clouds to make the pattern on the transparent area - LOL. I pasted the image into all flags at once, that way the transparent area became different on each post-it flag.


8 different paper pennants in .png format for you to play with.
http://www.4shared.com/Paper_pennants.html
http://www.4shared.com/View-master frame.html
Remember the old View-Master devices, where you could view 3D pictures
(also called stereo images ) on a paper disk?
My husband had one as a kid, and told me that they watched Disney and Tintin pictures on it.
I made one to display some of my favorite things. Add your own text and pictures to the paper disk.


Thought I would make another type of label holder, so here it is. This bag contains:
Nine finished label holders with screws
One .PSP template. Just apply your color/pattern to the two color layers. Depending on your color/pattern turn the opacity on the two color layers up or down. Screws are also included in this template, just turn the 3 top screw layers on/off to show them.
One . PNG grey scale labelholder to recolor.
Download here:
I also made an additional set of post-it flag without the lower shadow, as I liked them too. There is also a .PSP template included here, so you can just paste your own color/pattern into the 6 different flags.
Download the post-it flags here:

Terms of use
THESE
GRAPHICS ARE MADE BY GUNHILD STOREIDE
MY FREEBIES ARE FOR BOTH PERSONAL AND COMMERCIAL USE. IF YOU USE MY
FREEBIES, PLEASE GIVE ME CREDIT BY MENTIONING MY NAME. DO NOT CLAIM
THESE FREEBIES AS YOUR OWN. FEEL FREE TO ALTER THESE IMAGES TO FIT YOUR
SCRAPBOOKING NEEDS, INCLUDING RESIZING, RECOLOURING AND CROPPING, AS
LONG AS CREDIT IS GIVEN TO THE DESIGNER. DON NOT SHARE THESE FREEBIES
WITH YOUR FRIENDS, BUT SEND THEM TO THIS PAGE TO DOWNLOAD. I WOULD LOVE
TO SEE YOUR WORK, SO FEEL FREE TO E-MAIL ME A LINK TO YOUR PROJECT
(CLICK ON THE SMALL ENVELOPE TO THE LEFT TO E-MAIL ME). A LINK BACK TO
MY WEBPAGE IS ALWAYS APPRECIATED. THANK YOU FOR YOUR SUPPORT, AND ENJOY
USING THE FREEBIES.